Window cleaning for clinics: a hygiene-focused guide
- Glenn Brosnick
- Mar 21
- 10 min read
Healthcare facility managers face a persistent challenge: maintaining spotless, streak-free windows while upholding strict hygiene standards that protect patients and staff. Windows in clinical environments accumulate dust, fingerprints, and airborne contaminants that compromise both appearance and infection control efforts. This comprehensive guide delivers practical, evidence-based methods to clean clinic windows effectively, incorporating color-coded tools, disinfection protocols, and monitoring techniques. You’ll learn how to balance aesthetic results with rigorous hygiene requirements, ensuring your facility meets patient expectations and regulatory benchmarks without disrupting daily operations.
Table of Contents
Key Takeaways
Point | Details |
Cleaning sequence | Clean dust and streaks with detergent before disinfecting to maximize effectiveness and avoid leaving residues that harbor microbes. |
Color coded tools | Use separate color coded implements for window cleaning to prevent cross contamination with patient care areas and other zones. |
Near patient target | Target below 2.5 CFU/cm² on windows near patient areas to guide cleaning effectiveness. |
Scrub driven | Scrubbing with detergent and mechanical action on frames and sills outperforms wiping alone and reduces dirt buildup on textured clinic surfaces. |
Hospital grade detergents | Use hospital grade detergents formulated for clinical environments and avoid harsh chemicals that can damage window coatings. |
Understanding hygiene requirements for clinic windows
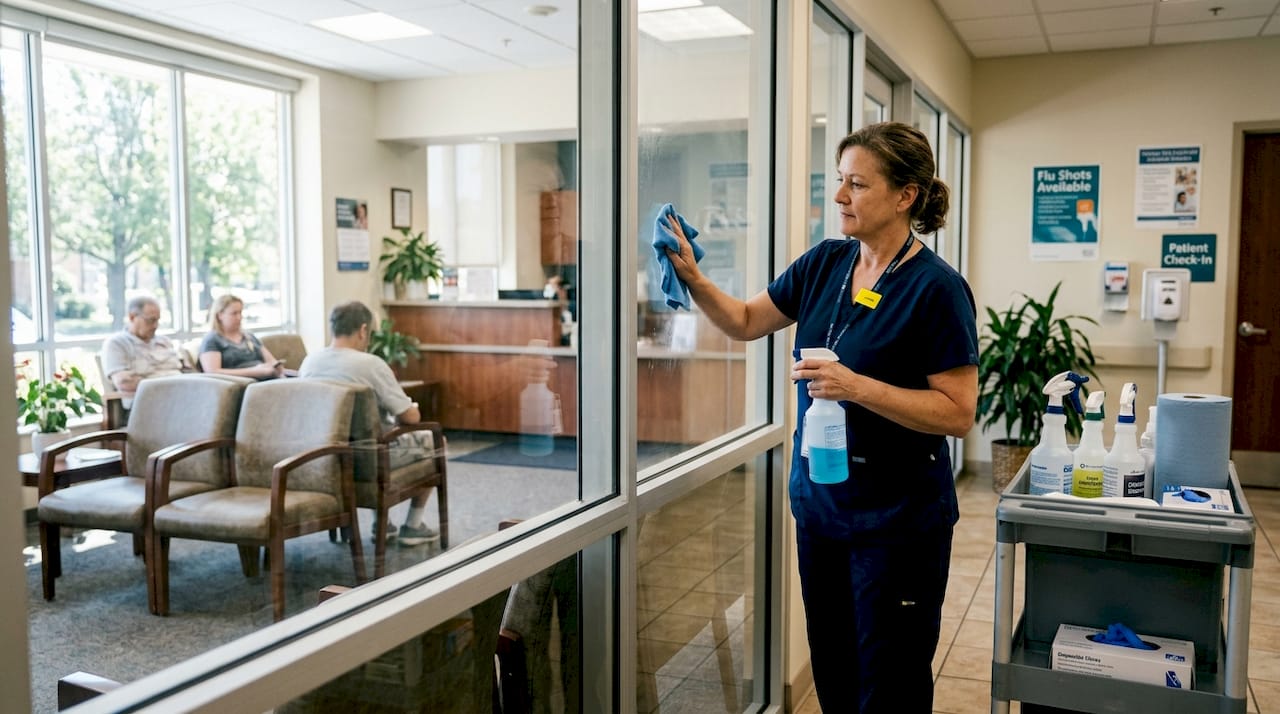
Windows are classified as low-touch surfaces requiring dust removal and streak-free cleaning followed by disinfection in patient areas. Unlike high-touch surfaces such as doorknobs or bed rails, windows don’t experience frequent direct contact, but they still accumulate airborne particles and occasional fingerprints that harbor microorganisms. The cleaning sequence matters tremendously: you must clean before disinfecting to maximize effectiveness and avoid leaving residue that attracts new contamination.
Color-coded cleaning tools prevent cross-contamination between different surface types in your facility. Assign specific colors to window cleaning equipment, ensuring these tools never contact patient care areas, restrooms, or food preparation zones. This simple system dramatically reduces the risk of transferring pathogens from contaminated surfaces to windows, then inadvertently to other areas during subsequent cleaning rounds.
Empirical research establishes bacterial load benchmarks for clinical surfaces. While windows typically qualify as low-touch surfaces, those near patient areas should target the same aspirational standard of under 2.5 CFU/cm² used for near-patient surfaces. This metric provides a concrete goal for your cleaning program and helps you measure improvement over time.
“Scrubbing with detergent removes organic material and microorganisms more effectively than wiping alone, especially on textured or rough surfaces common in healthcare facilities.”
Choosing the right tools makes a measurable difference. Research shows that detergent with scrubbing brushes outperforms microfiber mops on tough or textured surfaces. For windows, this means using dedicated scrubbing tools for frames and sills where dirt accumulates, while reserving squeegees for smooth glass surfaces. Avoid the temptation to use the same microfiber cloths across multiple surface types, as this practice undermines your infection control efforts.
Key hygiene principles for clinic windows include:
Clean visible dust and streaks first with detergent solution before applying disinfectants
Use separate color-coded tools exclusively for window cleaning tasks
Target bacterial loads below 2.5 CFU/cm² on windows near patient areas
Apply mechanical action through scrubbing rather than relying solely on chemical disinfectants
Allow adequate contact time for disinfectants to work after cleaning
These standards align with broader window cleaning medical offices protocols that balance aesthetic results with infection prevention. Understanding these requirements helps you design a cleaning program that protects patients while maintaining the professional appearance that builds trust and confidence.
Preparing your clinic for effective window cleaning
Successful window cleaning starts long before anyone touches a squeegee. Gather hospital-grade detergents specifically formulated for clinical environments, avoiding products with harsh chemicals that damage window coatings or leave residues. Your equipment list should include color-coded scrubbing brushes, squeegees, microfiber cloths designated solely for windows, buckets marked for window use only, and approved disinfectants with documented efficacy against relevant pathogens.
Timing your window cleaning minimizes disruption to patient care and staff workflows. Schedule deep cleaning during off-peak hours or between patient appointments, reserving high-traffic periods for spot cleaning only. Most clinics find success with comprehensive window cleaning every two to four weeks, supplemented by daily spot checks in waiting areas and examination rooms. Adjust this frequency based on your facility’s patient volume, local environmental factors like pollen or industrial pollution, and proximity to busy roads.
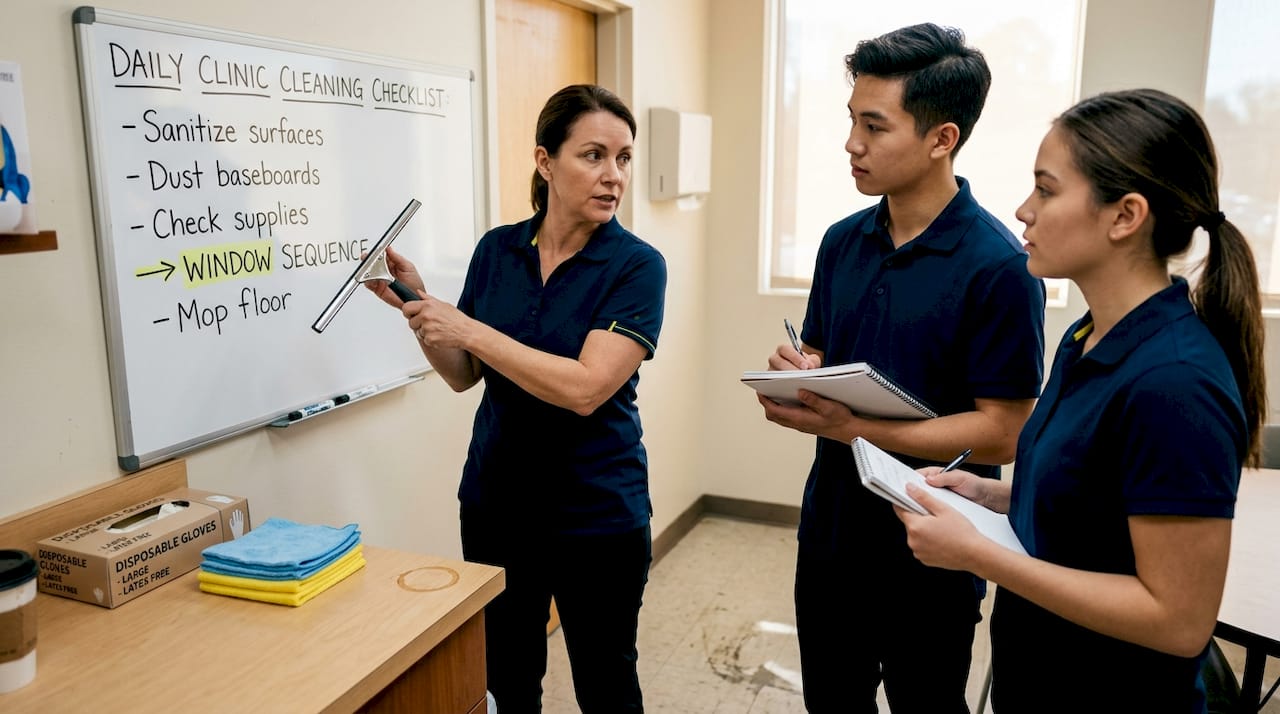
Training cleaning staff on proper sequences and hygiene risks pays dividends in both results and safety. Your team must understand why they clean before disinfecting, how cross-contamination occurs, and which tools to use for each task. Provide hands-on demonstrations showing correct squeegee angles, appropriate pressure for scrubbing frames, and safe handling of cleaning chemicals. Regular refresher sessions keep these practices top of mind and allow you to address questions or concerns.
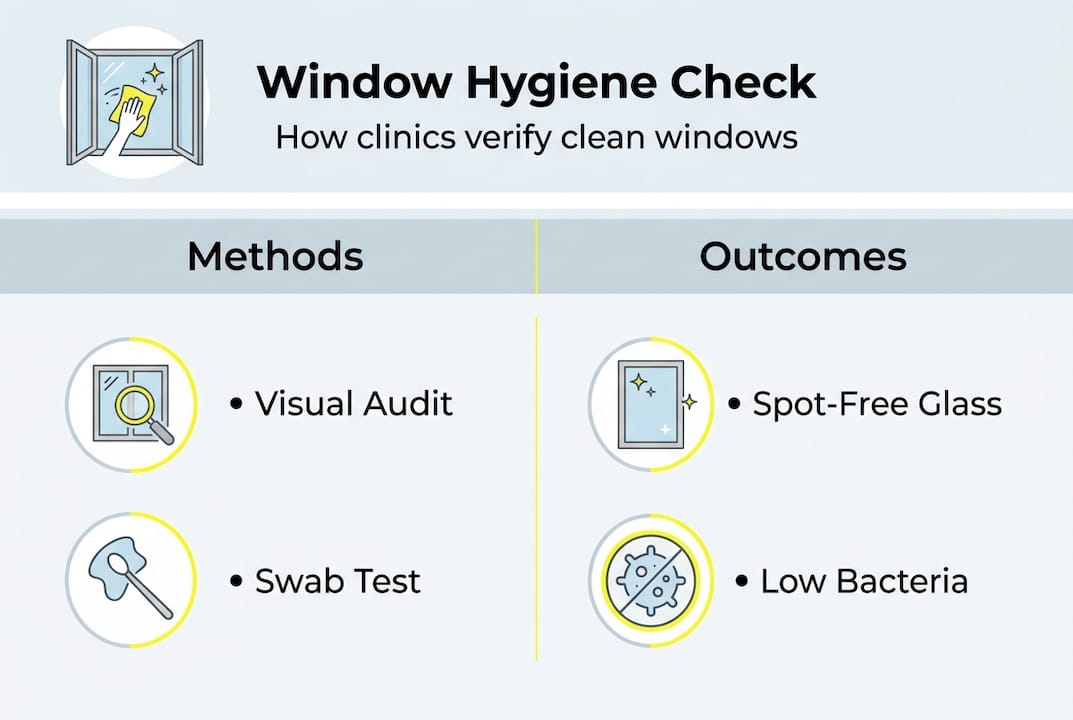
Regular audits and multimodal monitoring drive cleaning compliance and continuous improvement. Implement a verification system combining visual inspections, ATP testing for organic residue, and periodic microbial sampling. Visual checks catch obvious issues like streaks or missed spots, while ATP meters provide immediate feedback on cleaning thoroughness. Microbial sampling offers the gold standard for hygiene verification, confirming your protocols achieve target bacterial loads.
Pro Tip: Conduct monthly audits using microbial swabs on a rotating selection of windows throughout your facility. Track results over time to identify trends, problem areas, and opportunities for additional staff training. This data-driven approach demonstrates medical office cleaning compliance to inspectors and stakeholders.
Monitoring Method | Frequency | What It Measures | Action Threshold |
Visual inspection | Daily | Streaks, spots, visible dirt | Any visible contamination |
ATP testing | Weekly | Organic residue | >500 RLU |
Microbial sampling | Monthly | Bacterial load | >2.5 CFU/cm² |
Staff observation | Quarterly | Protocol adherence | Any deviation from procedure |
Preparing your clinic also means coordinating with clinical staff to understand which windows require priority attention. Examination rooms, procedure areas, and spaces housing immunocompromised patients demand more frequent cleaning and stricter hygiene standards than administrative offices. Document these priorities in your cleaning protocols and communicate them clearly to your team. This preparation ensures everyone understands expectations and can execute the cleaning process efficiently when the time comes. For additional context on maintaining clinical spaces, review doctor office cleaning tips that complement window-specific protocols.
Step-by-step window cleaning process for clinics
Executing effective window cleaning in clinical settings requires a methodical approach that prioritizes both appearance and hygiene. Follow these numbered steps to achieve consistently excellent results:
Remove loose dust and debris from window frames, sills, and glass using a dry microfiber cloth or soft brush designated for windows only. This prevents scratching the glass and reduces the amount of dirt you’ll need to dissolve with cleaning solutions.
Prepare your detergent solution according to manufacturer instructions, using hospital-grade products in color-coded buckets reserved exclusively for window cleaning. Water temperature matters: lukewarm water dissolves dirt more effectively than cold while avoiding the streaking hot water can cause.
Apply detergent solution generously to the window surface using a clean sponge or scrubbing tool, working from top to bottom. Pay special attention to corners, edges, and frames where grime accumulates. The mechanical action of scrubbing matters as much as the chemical cleaning agent.
Scrub frames and sills thoroughly with color-coded brushes, applying enough pressure to dislodge stuck-on contaminants without damaging surfaces. Research confirms that scrubbing with detergent outperforms passive wiping methods on textured surfaces common in healthcare facilities.
Use a professional squeegee to remove cleaning solution from glass, overlapping each stroke slightly and wiping the blade after each pass. Start at the top corner and work across and down in a reverse-S pattern for best results.
Dry frames, sills, and edges immediately with clean microfiber cloths to prevent water spots and eliminate moisture that could support microbial growth. Damp surfaces in clinical environments create opportunities for contamination.
Apply approved disinfectant to all window surfaces after cleaning, following manufacturer guidelines for contact time. Never skip this step in patient care areas, even though windows classify as low-touch surfaces.
Allow disinfectant to air dry completely or wipe according to product instructions, using fresh microfiber cloths from your color-coded window cleaning set.
Pro Tip: Avoid cleaning windows immediately after disinfecting other surfaces in the room. Airborne disinfectant particles can settle on freshly cleaned windows, leaving residue that attracts dust and creates streaks. Schedule window cleaning before or well after other surface disinfection.
Cleaning Method | Effectiveness | Best Use | Limitations |
Detergent with scrubbing brushes | High on all surfaces | Frames, sills, textured glass | Requires more time and effort |
Squeegee technique | High on smooth glass | Large window panes | Less effective on small panes or divided lights |
Microfiber mops | Moderate | Quick maintenance between deep cleans | Insufficient for tough grime or textured surfaces |
Spray and wipe | Low to moderate | Spot cleaning | Can spread contaminants if cloths aren’t changed frequently |
The comparison above helps you match methods to specific situations in your facility. Large windows in waiting areas benefit from efficient squeegee techniques, while small windows in examination rooms may require more detailed brush work. Understanding these distinctions improves both efficiency and results. For broader context on maintaining professional spaces, explore this window cleaning guide for offices that complements clinical-specific protocols.
Consistency matters as much as technique. Train your staff to follow these steps in order every time, resisting shortcuts that compromise hygiene or appearance. Document the process with photos or videos showing correct tool usage and proper sequences. This investment in training and standardization pays off through better results, fewer patient complaints, and stronger infection control outcomes.
Verifying cleanliness and maintaining long-term standards
Even experienced cleaning teams make mistakes that compromise window hygiene and appearance. Common errors include skipping the disinfection step after cleaning, using the same tools on windows and other surfaces, applying too little mechanical action during scrubbing, inadequate drying that leaves streaks and water spots, and cleaning windows in direct sunlight that causes solutions to dry too quickly. Recognizing these pitfalls helps you coach your team toward consistent excellence.
Verification methods provide objective evidence that your cleaning protocols work. Visual audits catch obvious problems but miss microscopic contamination. ATP meters measure organic residue in real-time, giving immediate feedback on cleaning thoroughness. Microbiological swabs offer the most rigorous verification, culturing samples to quantify bacterial loads and confirm you’re meeting target benchmarks. Implement all three methods on rotating schedules for comprehensive quality assurance.
Regular monitoring delivers measurable patient safety benefits. Studies demonstrate that enhanced cleaning reduces environmental MRSA detection in clinical areas significantly, though success requires strict protocol adherence. While windows represent lower-risk surfaces than bed rails or medical equipment, they contribute to the overall microbial burden in your facility. Maintaining clean windows as part of a comprehensive environmental hygiene program supports infection prevention efforts across all surface types.
Develop a maintenance schedule that balances cleaning frequency with operational realities. High-traffic areas with large windows may need weekly attention, while administrative spaces can extend to monthly deep cleans with interim spot cleaning. Document your schedule in writing, assign clear responsibilities, and track completion rates. This systematic approach prevents windows from being overlooked during busy periods when other priorities compete for attention.
Key verification and maintenance practices include:
Conducting visual inspections daily in patient care areas and weekly in administrative spaces
Using ATP testing weekly on a rotating selection of windows to verify organic material removal
Performing microbial sampling monthly to confirm bacterial loads remain below 2.5 CFU/cm²
Reviewing cleaning logs quarterly to identify patterns or gaps in protocol execution
Retraining staff immediately when audits reveal consistent errors or oversights
Pro Tip: Train your staff to recognize early signs of streaking or spotting during daily rounds. Addressing these issues immediately prevents buildup that requires intensive cleaning later. Empower team members to perform quick touch-ups when they notice problems rather than waiting for scheduled deep cleaning days.
“Sustained improvements in environmental hygiene require ongoing monitoring, feedback to cleaning staff, and management commitment to maintaining high standards even during periods of high patient volume or staff turnover.”
Maintaining standards over time demands leadership commitment and adequate resources. Budget for quality cleaning products, replace worn tools promptly, and schedule sufficient staff time for thorough cleaning. Recognize and reward team members who consistently deliver excellent results. These investments in your environmental hygiene program pay dividends through better patient satisfaction, reduced infection risks, and a professional facility appearance that builds community trust. For comprehensive guidance on sustaining clinical cleaning standards, review protocols for window cleaning medical offices that address long-term quality maintenance.
Professional window cleaning services for Northeast Florida clinics
Implementing the protocols outlined in this guide requires time, training, and consistent execution that busy facility managers often struggle to maintain alongside competing priorities. My Lemon Maids specializes in clinical and office window cleaning with a hygiene-focused approach that meets healthcare standards. Our team understands the unique requirements of medical facilities, from color-coded tool systems to proper disinfection sequences that protect patients and staff.

We design cleaning schedules around your operational needs, minimizing disruption to patient care while ensuring windows throughout your facility maintain the spotless appearance and hygiene standards you require. Our protocols incorporate the evidence-based methods discussed in this guide, including appropriate tool selection, effective cleaning sequences, and verification procedures that document results. Whether you need comprehensive window washing and cleaning services or prefer to integrate window care into broader deep cleaning services info for your entire facility, we customize solutions to fit your specific situation. Explore our office cleaning services info to see how professional support helps you maintain consistent standards while freeing your team to focus on patient care.
Frequently asked questions
What type of cleaning solutions are safe for clinic windows?
Use hospital-grade, non-abrasive detergents specifically approved for medical environments to avoid damaging window coatings while ensuring effective pathogen removal. These products balance cleaning power with safety, containing no harsh chemicals that could harm patients, staff, or window surfaces. Always verify that your chosen detergent carries appropriate certifications for healthcare use and follow manufacturer dilution instructions precisely to maintain both safety and effectiveness.
How often should clinic windows be cleaned to maintain hygiene?
Ideal cleaning frequency ranges from biweekly to monthly depending on patient traffic, local environmental conditions, and window proximity to patient care areas. High-traffic waiting rooms and examination spaces near patient activities benefit from more frequent attention, while administrative areas can extend to monthly schedules. Monitor your windows between scheduled cleanings and adjust frequency if you notice increased soiling, streaking, or patient comments about appearance.
Can improper window cleaning increase infection risks in clinics?
Yes, poor cleaning techniques can harbor pathogens and enable indirect transmission that undermines overall facility hygiene and patient safety efforts. Using contaminated tools across multiple surface types, skipping disinfection steps, or failing to remove organic material before disinfecting all create opportunities for microorganisms to persist and spread. Following proper protocols with color-coded tools and correct sequences dramatically reduces these risks and supports your infection prevention program.
What tools help prevent cross-contamination during window cleaning?
Use color-coded cleaning cloths, brushes, and squeegees dedicated exclusively to window areas, combined with strict protocols preventing cross-use with other surfaces. Assign a specific color to window cleaning equipment and train staff never to use these tools on high-touch surfaces, restrooms, or patient care areas. This simple system creates a visual reminder that prevents accidental contamination and demonstrates your commitment to medical office cleaning compliance standards that protect everyone in your facility.
Recommended
Comments